Wednesday, June 13, 2012

Notice

I may be only updating the blog once a week now :'[
Sorry guys.

Also, a note on beauty recipe:

  • ground up orange peels
  • water/milk
Mix it into a paste and it makes your skin smooth and paler.

Sunday, June 10, 2012

Steamed Bun: A Steamed Food Experiment

Hello reader, it's only a day late, sorry about that.
So, yesterday, I decided to experiment by steaming an egg, hoping to make something like egg tofu.

The result was really fluffy. Also overcooked. It smelled overcooked. However, it was not burnt. The only thing affected was the smell.


Also, it was not just egg, it was egg with other ingredients like milk.

So today I decided I wanted to make a steamed sweet bread.

In fact, I have just finished making it, and it looks good. So here's a recipe guys [REALLY SIMPLE ;D]:

  • 50 grammes of milk
  • 1 egg
  • 50 grammes of flour
  • 40 grammes of sugar
  • 1/2 teaspoon of baking soda
And good news, even if it smells like you oversteamed it, just let it sit until the smell goes away. It's pretty hard to mess it up, which is good for people like me that get distracted easily. Also, I made this just a little sweet, so you can make it sweeter if you want, but this bread must be something traditional since my mom told me it is like a taste from her childhood.

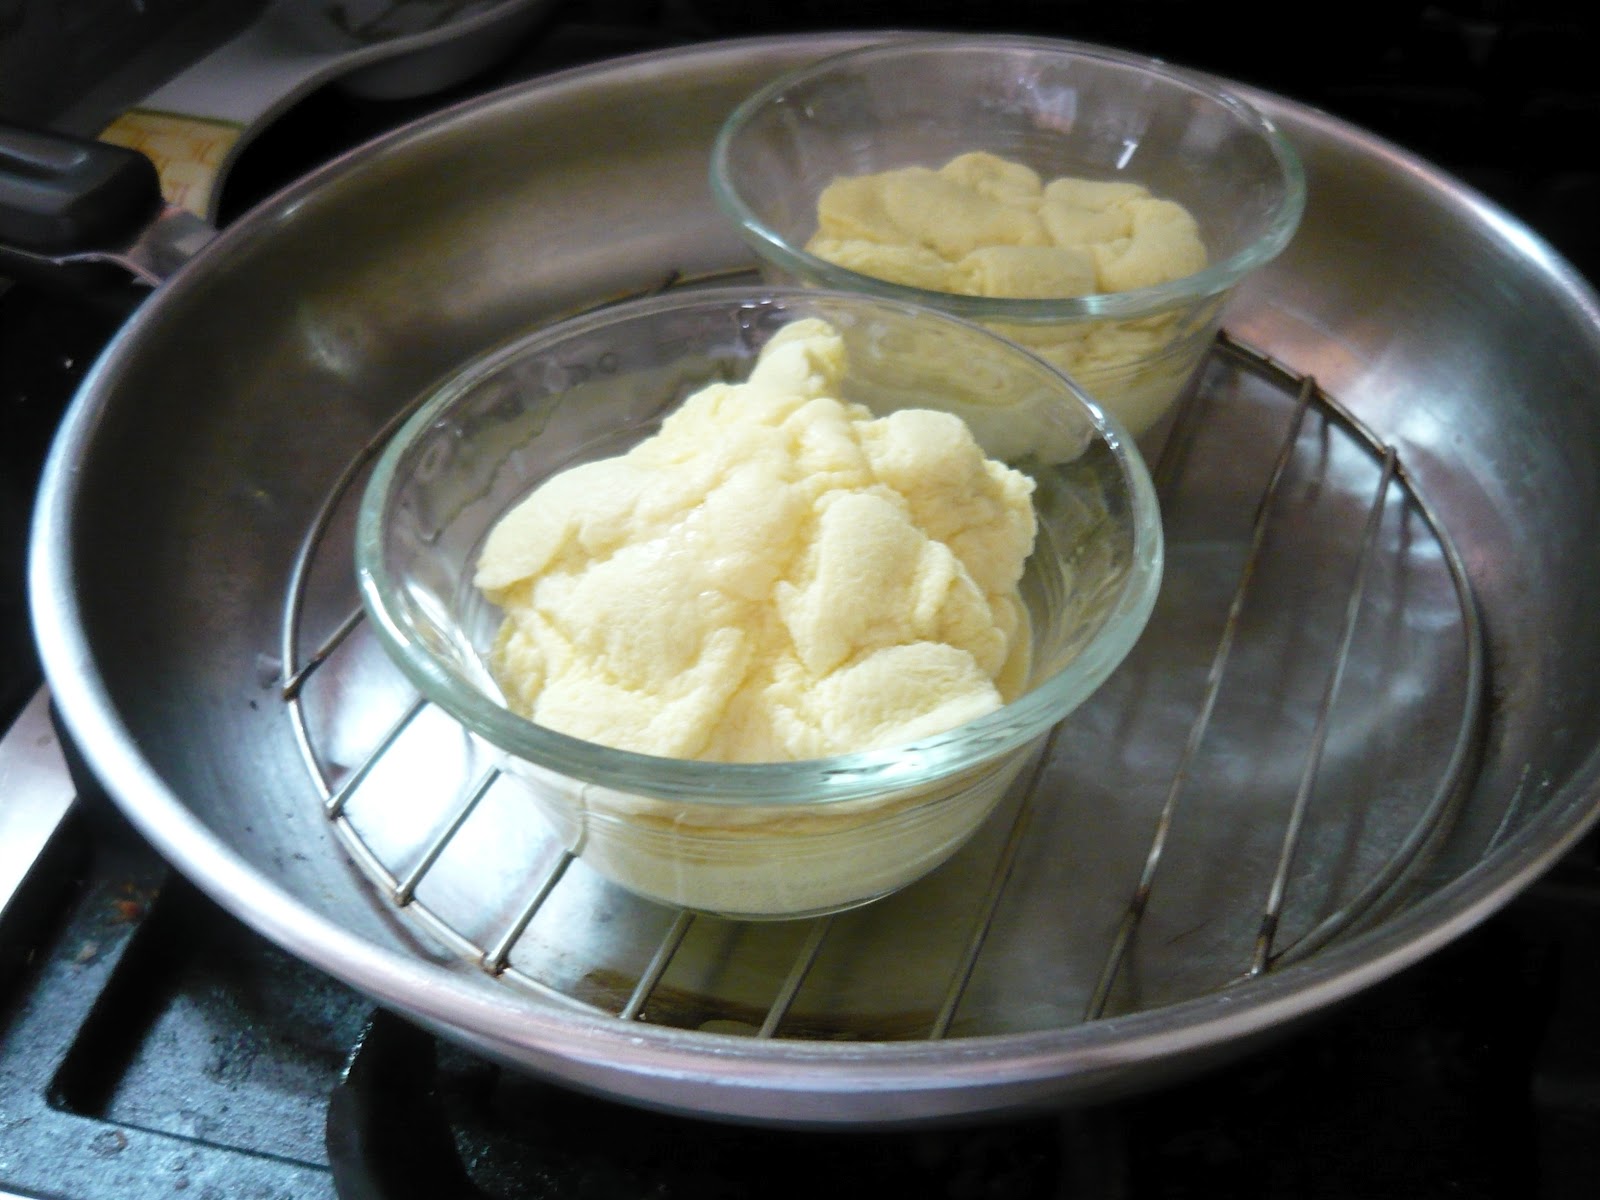
This generally makes 2 little steamed breads.

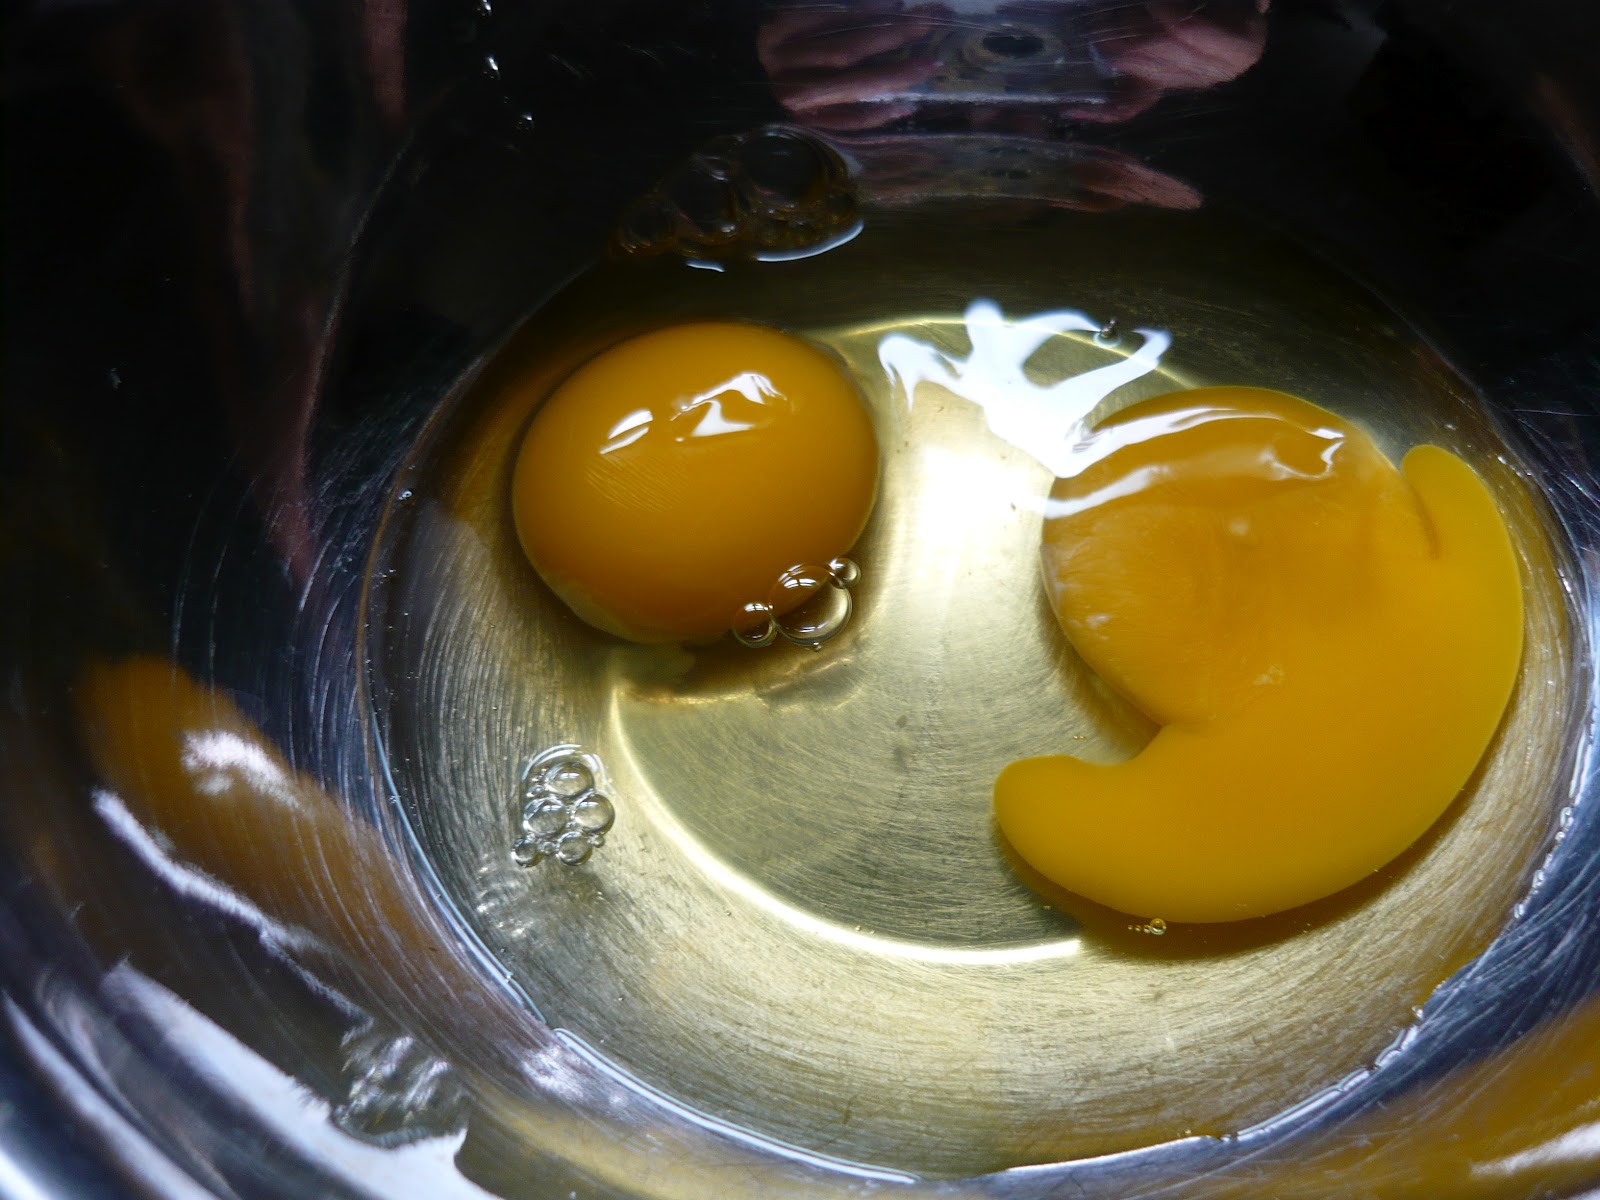
Place your egg and milk into a bowl and beat them.

Then add your flour and whisk to incorporate.

Once the flour is mixed in, beat in the sugar, followed by gently stirring in the baking soda.


Place a cupcake liner into a small dish, one that is ovenproof, and then pour in the batter. You can pour the batter up to 1-2mm away from the top of the cupcake liner. 

Boil water, and once it starts to boil, place a rack into the pan for steaming. Place your bowls onto the rack, and steam for 15-20 minutes, or until you can stab it with a toothpick and it feels solid all through.


Steam away!!

Sweet Pea

Saturday, June 2, 2012

Banana-rama: Guest starring ripe bananas, again!!

Hello reader,

Do you know what Beethoven's favorite fruit is?
BA-NA-NA-NA!! (to the tune of his 5th symphony)

I am so close to finishing off these ripe bananas...they are so close to being squished by delicious oranges in the fruit bowl...
Grrrr...you spotty bananas!!

Today we're shining the spotlight on ripe bananas for a second time, and making Banana Cookies :D
Original recipe here.

Now for the Sweet Pea version!!
You will need:


  • 1 1/2 sticks of butter at room temperature
  • 150 grammes of brown sugar
  • 2 ripe bananas
  • 250 grammes of flour
  • 1 teaspoon baking powder
Start mashing the butter, and once mashed, mash in your sugar. The sugar tends to have a hard time getting mashed in all the way, so once it's mostly mashed in, stir it in.


After, add in the bananas the same way that the brown sugar was added...I'm not including a picture because it doesn't look to great at this stage. But it sure smells good :)

Once you are done adding bananas, pour the flour into the bowl and stir until incorporated. Then, as usual, the baking powder is added last. Why is it added last? That's because I tend to alternate between baking and watching tv, so if I added the baking powder in the beginning it would start to get fluffy before it needed to...then again, if you do your baking in one continuous session, then feel free to add the baking powder.


You can frost if you want to, I modded the recipe from the same source (basically simplified it to make life easier ;] )
Frosting~ Sweet Pea version:
  • 2 tablespoons of butter
  • 3 tablespoons brown sugar
  • 2 tablespoons milk
  • 1 1/4 cups powdered sugar
Place the butter in a saucepan over low heat, and let it melt. Once melted, add the milk and brown sugar and wait for it to boil.

Once it boils, take it off the heat and add the powdered sugar, stir it in, but don't beat it.

If you did it right, your cookies should look like the ones on the left.


Note: If the frosting seems too thick, don't just continue and frost the cookies like dum-dum (me, lesson learned), thin it out with a few drops of water. Don't add too much at one time, otherwise there goes the frosting. Add a little at a time.

The cookies are cake-like and oh so fluffy.

Go bananas!!

Sweet Pea


Thursday, May 31, 2012

Making Ravioli with Chef Sweet Pea

Hello readers, did you get the joke?

(I have a famous role model right now ;] )

Today I'm making ravioli for the first time!! It's pretty interesting. Also, the warm weather makes it easier to knead and mix the dough...though it makes it stickier too :P

So far I've used:
  • flour 450 grammes and extra for dusting board/counter/place you roll dough/rolling pin
  • eggs 6
  • filling (I will include my recipe later I used Spam & hot-dog, this is up to you and whatever ravioli you desire :] )
As I said before, eggs are cracked on by one into a separate dish before being added one by one to the bowl. Afterwards the flour is poured into the bowl and it is mixed with a fork, slowly, until fully incorporated.


Once fully incorporated, I knead it until it is elastic. The way I knead is fold and half, turn it a quarter turn, fold it and half, then push down and away from myself into the dough with my palms. Once you have an elastic dough ball, wrap it in plastic wrap and let it relax for 30 minutes at room temperature.


Snug in the cling wrap


Afterwards, take a third of the dough and put it onto a flat surface and start to roll it out. Be sure to flip it over every now and then so that it doesn't stick, and sprinkle flour onto the surface as necessary. Try for a rectangle shape. When making this, I rolled it out to about 1 mm thin, but the thinner it is the better it tastes, so try to go for thin--though not paper thin. Follow the pictures for how to seal the ravioli.

Method 1:
Cut into strips, cut one strip into squares and put filling on each square

Place strip over squares

Cut into individual pieces and press edges with fork to seal
 Method 2: the much easier way

Make two strips, line up fillings on one strip, then flop other strip over the fillings and seal by pressing edges with fork then cut into individual pieces


Note: if you have a pasta roller, use it, I'm sure tons easier

om nom nom


Though not pretty, my ravioli was a delicious and filling dinner.
If you were wondering, that's some cream of mushroom sauce.

Hope you can make tasty ravioli too ^_^'

Sweet Pea

Wednesday, May 30, 2012

Old Bananas? FEAR NOT!!~~ A lesson on banana cake

My house smells like bananas...
SWEET PEA'S HOUSE 17:30 WEDNESDAY AFTERNOON


Oh, hello reader, how are you today?
Do you have spotted bananas in your house like I do?
Do you question what to do with such bananas?
Or do you scarf them down in an attempt to rid yourself of them? (like I do with most leftovers XP )


Well, FRET NOT, dear reader, for today is that day when that problem is solved.
The solution?
da da da da...
BANANA CAKE
(Did you read the full title? In that case you probably weren't surprised.)


Note: this recipe is a modification of plain vanilla cake (not mine) HIGHLY EXPERIMENTAL


Warm up your oven to 350 degrees (Fahrenheit)

Note: This took my about 3 hours to make, including the time I stopped to do other things, start to finish


Be sure to grab:

  • flour 200 grammes
  • sugar 200 grammes
  • butter 1 stick (aprox 115 grammes)
  • eggs 2
  • milk 120 mL
  • baking powder 2 tsp
  • bananas 2-4 depending on how much you like bananas ( add an additional 50-75 grammes of flour if you use 3 or 4 bananas)
Allow your butter to warm up to room temperature, then mash it with a fork. I know that the last time cake was made I mashed the butter with the sugar, but it's easier if you mash the butter alone, then add the sugar. That said, when you're done mashing the butter, mash in the sugar.


After mashing your sugar and butter, mash in the bananas, followed by stirring in the flour.
When mashing the bananas, mash them as finely or coarsely as you like--just know that they get more liquid the more they are mashed.

Weather changes the conditions of cooking, and if you find your mixture stiff, mix the milk then flour; if you find it more loose, feel free to add the flour first.

Note: Today I have been consistently 5 grammes off (with the sugar and flour)


Mix in your eggs, and milk if you haven't already, and feel free to add a dash of vanilla at this point. You may now add your baking powder, and after stirring thoroughly, pour your cake into your baking pan of choice and bake for 30-40 Update/Correction 45-55 minutes.


The cake browns like a waffle...and it browns a lot...I suppose if you don't want it to brown so much, you could loosely cover your pan with a tin foil tent.

The cake is remarkably fluffy, almost as much as sponge cake--currently fresh out of the oven.


The cake is undone, so I flipped it onto a plate...it's uncooked on the bottom...the plate is oven safe, into the oven it goes.

15 minutes later...
It's all good. (Correction made, see strike-through).

Looks like a cheese round, haha


Brown Bananas Bake into Banana Bread cake (:
(try saying that 5 times fast, haha)

Have fun making and baking (and enjoy my tongue twister)

Sweet Pea

Sunday, May 27, 2012

The Making of Multicolor Jello

Hey readers,
Sorry about not updating Saturday, life happens >.<
Though I cooked Saturday, there wasn't the time to post.

At any rate, something that I like to eat on hot summer days is jello, and it's great since it's cool and smooth and very refreshing after a hot day in the sun. But, sometimes it gets a little boring to eat the same old thing over and over, so I decided to make some multi-color jello.

You can start by grabbing your favorite flavors of jello. I made a three layer three flavor combo, but you can use two flavors or layers if you like. Here's what I used to make my jello dessert, feel free to edit the list to your  tastes:

  • 1 pack of cherry jello
  • 1 pack of lime jello
  • 1 pack of raspberry jello
  • strawberries
  • mandarin orange slices (the ones in water/light syrup)

The first thing to do is prepare your jello according to the package's instructions, and allow it to set until firm. I chose to add fruits to mine before putting it in the fridge, and my suggestion is that if you want to arrange the fruits, that you'd better have a steady hand when placing the cup/bowl of unset jello into the fridge since the fruit moves easily.


Once your jello is set, prepare your second flavor of jello according to the directions, but don't pour it into your containers just yet. Allow it to sit in the fridge anywhere from 15-30 minutes so that it can cool down.  My first layer was cherry.

While you wait, here's a simple design for jello.
You can take this time to add the next layer of fruit to your jello.

Tada~
After letting that cool, you can add it to your jello containers. Pour slowly so that you don't disturb your jello.

Layer two complete.

Lime layer.
Same process goes for the third layer. My final layer is raspberry. You can add more layers if you like though.

If you want thin strawberries, slice them slowly.
Final product:

Jello is jiggly~
Also, you could make this red (cherry, raspberry) white (pudding, whip cream) and blue (berry blue) for memorial day :)

Happy Memorial Day~

Sweet Pea

Wednesday, May 23, 2012

Little Panda Bento

Dear readers, I have been low on time lately, and the kitchen is suffering, but this weekend and next week is much more time, so look forward to it!!

Also, I officially declare this blog to be updated on Wednesdays and Saturdays.

Today I am making mini-panda bento. It's a little bento with a lot of cuteness!!

For the panda you need:
  • white cheese
  • seaweed sheet
For the bento you need:
  • rice (any type you like)
  • ketchup (or your choice of a similar texture and color sauce)
Select a container for your bento


Then fill it with rice. To make the top smooth, wet a spatula and use the spatula to press down and smooth the top of the rice.

Sesame rice, recipe at bottom.

Place two blobs of ketchup onto the rice, then spread them out with a butter knife...


...to make hearts.

The bottom heart is so cute--it's better since the smoothed rice.
 Cut out a bear shape from your cheese, like the picture.

This will become our panda
Pick up your panda gently and hold it by the middle since the ears are rather delicate, then place it onto your rice.


Then cut out two circles of seaweed, and place them shiny side up onto the cheese. Be very careful since once you put it down, it's hard to remove afterwards.


 Then cut out two smaller ovals for eyes.


Cut out a wide 'v' for the mouth, and little panda bento is done!!


 Here is recipe for sesame rice:

  • sesame seeds (judge how much to use by how much rice you have, use the picture as a reference)
  • rice
  • chicken powder (optional)
Place ingredients in a bowl


Mix and you're done!!


Hope you like your little panda bento!!

Sweet Pea