Thursday, April 26, 2012

Sweet Soup: Sai Mai Lo

Okay, I admit that it's not actually soup, but it is a delicious soup like dessert. And the other reason I call it sweet soup is because for the longest time I had zero clue as to what is was actually called. So yesterday, after having learned its name a on Monday, I made it!! (yes, yes, late post but I was quite busy)


Sai Mai Lo, good to eat while watching favorite TV show ;)


Before I get into how it all boiled down, I'd like to give credit to Kirk who writes Chinese Homemade Cooking for his Sai Mai Lo recipe and instructions; I adapted his recipe and used his instructions (more or less, probably less since my laziness makes me improvise xP).


I used...

  • 4 medium sized small taro
  • 1 cup tapioca
  • 1 can sweetened condensed milk


First off, I have a confession. I never bought taro before. I'm not sure if taro type matters, but I used little taro. I'm not sure if I made a good selection buying it, and can't really give advice on how to buy taro; I just asked one of the store people how to pick good taro and he just gave me a few~~so I don't really have much to say on buying taro (I'm so new to taro :/ ). What I can tell you (er--at least a few New Yorkers), is that the taro from New World Mall in Flushing tastes fine so if you want to replicate this to a tee, that's the place to go.


Taro. They're hairy like coconut.

The first thing that you must do, as with all your fruits and veggies...or roots...is wash them!! And so I did.
Afterwards, I peeled them...my hands felt sticky and gooey from the white stuff that oozed from the taro. My mom said they smelled earthy (note: when people say earthy, it usually means it smells like wet grass and dirt).

Peeled taro, slightly sticky
Taro looks a bit like potatoes

Next I went about cutting the taro into medium sized cube-ish pieces.

The inside appears a good deal lighter then the outside, even with the skin peeled

All done!!


Now that I've cut the taro, it's time to cook the tapioca. Mine is green. Making this little tapioca is the same process as when I made the big tapioca for bubble tea in this post, however you must watch it more carefully and stir more often because it will become stuck together really fast if you aren't keeping an eye on it.

I wonder what color it will turn out to be?

Close up of tapioca, this is my favorite color!!
 I suggest you stir frequently the first 5-15 minutes and keep a constant eye one it. After that you should be able to stir it every 5-10 minutes without worrying about it clumpling, but if you're really concerned about clumping then you should stir it and check every other minute or so. Also, I added 1 cup of water when the water got really starchy and hard to see through.


Don't forget to stir or else it will start to clump like mine did (not good)
 I cooked my tapioca until there were only little white dots left in it. Then I spooned the tapioca into a mesh strainer and put the strainer in cold water, to stop the cooking, then dump it into a bowl.


My bowl of tapioca, looks like fish eggs :O...or maybe frog eggs since they're green?

Close look at tapioca, now it really looks like eggs!! @_@
I then boiled my taro. I boiled it until it was firm, but easy enough that I could poke a fork through it. It was not so soft that it crumbled when I poked it with the fork. 

Note: I used the water from the tapioca to boil the taro in because I want to keep the starchy water. I think it helps to make the end result thicker. You could dump it and use new water if you want though. The water that boiled my tapioca and taro also became the water for the sai mai lo (my sweet soup, as I call it).


After the taro is cooked, I mashed it until I had pieces that are about 1cm or smaller.


Mashed tapica, like mashing potatoes but smells a little different. I used a fork to mash it.
I kept me tapioca/taro water and brought it to a boil and prepared to add my condensed milk, tapioca and taro.
All lined up and ready to go!! Having it by the stove top makes preparation time less.
 While I added the condensed milk I was stirring constantly so that it wouldn't burn to the bottom. I kept stirring constantly until the condensed milk was completely dissolved and the color looked smooth and uniform. I then added the taro and stirred until the mashed up parts were mostly dissolved and the chunks were broken up (they kind of stuck together after I mashed some of the taro).
Note: I kept the fire on medium to medium-low since there is a good deal of sugar in the sweetened condensed milk--aka significant risk of burning something.


So far, water, milk, and taro is in the pot.
Then I start to add the tapioca, I felt so excited because my sai mai lo is nearly done :)
Also, if your tapioca is sticking in a big glob, don't worry, mine did and it breaks up in the sweet soup while you stir.

Nearing completion ;]
Once it is done, simply turn off the heat, give it a stir, and have a bowl of sai mai lo!!


My hard work tastes delicious :D
Sweet things taste best when shared, give a friend a small jar of sai mai lo and they will be happy!!


Until the next recipe,
Sweet Pea


Tuesday, April 24, 2012

Another Chocolatey Adventure!!

Once again I try my hand at making chocolately creation that is sweet and satisfying, as well as affordable!!


This time I am making chocolate chocolate...as in milk chocolate type candy I suppose. The feedback that I received today about my attempt at a simple white chocolate candy was interesting to say the least. My friend told me that it had a unique taste that could not be described, but good nonetheless. I was also told that it looked like soap...I guess that this means it has potential for some good practical jokes :)


I think that what people consider chocolate flavor is regional, seeing that my new york buddies said it didn't taste much like chocolate, but a friend who's from hong kong was surprised as she said how it tasted a lot like chocolate (and not like the vegetables [shortening] it's made of). 


Onto the more chocolately attempt today.


I am using a recipe similar to yesterday's with one big change, I added cocoa powder.


It is as follows:


  • 2oz shortening
  • 1/3 cup powdered sugar
  • 1 tsp powdered milk
  • 2 tsp cocoa powder

Step 1: Heat up the shortening. I did this in a microwave oven, and I heated it up for 45 seconds, checked to see how much it melted, and heated it up for an additional 30 seconds. After this it was completely melted so I heated it up 30 seconds more to get it nice and hot...or warm, heat makes it easier to work with. Then I add in the powdered milk and stir.

In this bowl is the melted shortening and the powdered milk 
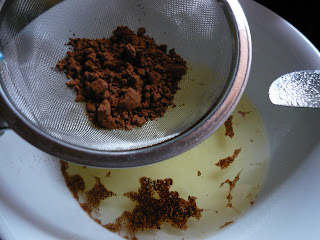
Step 2: After adding the powdered milk, I sift in the cocoa powder. It was making a pretty cool pattern in the shortening...it was like, ooooohhh :O
When you get a few chunks left, like I did using a fine mesh, you can press the rest through with your finger.

See the pattern in the shortening?
I like to wait for the cocoa powder to melt in as much as it can, I think it makes for a smoother end product...and less stirring x3
Patience, let it melt away...

 Step 3: I add in the powdered sugar, and also let it melt a little...though by this point my mix wasn't as heated as I would prefer it to be, so I popped it in the microwave, covered, for 30 seconds. If the sugar melts really slowly into your mix I suggest you do the same. If you do choose to mix it in while it's only warm or very warm it might come out a bit thick or chunky, possibly uneven in texture.


In the the powdered sugar, looks like coffee to me!!
 Step 5: Now that the everything has been mixed in, quickly transfer the chocolate to the molds. I spoon mine in...and I think I do a good job, not too messy. If you work too slow it starts to thicken up.


Chocolate, freshly spooned in.


Okay, so not perfectly neat either :P
 Now it's time to step back and enjoy the finished product~


The foil effect, makes it look authentic!!

Here are the rest of the chocolate, happy family of chocolately love~


I hope that you enjoy reading about the chocolate as much as I enjoyed making them!!

Till next time,
Sweet Pea


Monday, April 23, 2012

PROJECT CHOCOLATE~

Made with Sweet Pea's love <3


I call today's adventure in the kitchen...PROJECT CHOCOLATE~
[insert dramatic music here]

WARNING: THE END RESULT IS NOT CHOCOLATE, I REPEAT, NOT CHOCOLATE, JUST SIMPLE AVERAGE QUICK TO MAKE CANDY (so please don't make nasty comments on how it's not chocolate, or how it's misleading...it's merely my attempt to create something that tastes like chocolate)

I always wanted to try making some quick 'n' simple white chocolate, since I heard that the lower end of white chocolate can be made with veggie oil or other fat substitute, so today I did--on a whim. Whimsical Sweet Pea, makes chocolates whenever the mood hits~

I looked around on the internet, and came up with a general recipe:

2 oz vegetable shortening
1/3 c powdered sugar
1/2 tsp powdered milk
dash of vanilla

Note: This is my own recipe that I made after browsing through a few other recipes and deciding how I wanted my chocolate to turn out, also, it's not really chocolate...if you try the recipe and post about it, please link to this post :)


Step 1: Heat up shortening in microwave for 1 minute, and then 30 seconds (and cover it)

Step 2: Stir in sugar and powdered milk until relatively smooth

The result of step 2--I stirred with a knife

Step 3: Wait a little for it to cool until it's no longer steaming hot, but still liquid-like and then pour into your mold (actually, I spooned mine in)

All poured, be sure to work fast

Here's a close up!! [Silicon mold]

Step 4. Once cooled completely, pop 'em out!!

Finished Product!! Yum! (it tasted far from chocolate :/ but still tasted pretty good :] )

Maybe this should have been candy on a budget? XP

And about the bubble tea...

BUBBLE TEA, CHEF'S LOG: DAY 3, TAPIOCA SUPPLIES RUNNING LOW...TEA DEPLETED.


Saturday, April 21, 2012

Making Bubble Tea: Day 2

Hello again!!
I made bubble tea today (well, today as in yesterday now, what with this midnight post), twice!!
The first time I made it for myself and forgot to snap some photos, but luckily my mom wanted some too!!


Here is the basic process, for the day after you've made your tea and tapioca:


Here is the sweetened tea and tapioca pearls, they live in my fridge...for now >:]

Microwave a little bit of water

Place the cold tapioca into the now hot water to warm up--they're white when cold

Meanwhile, make the tea--sweetened tea goes into shaker

Add milk, or cream

Cap shaker, and SHAKE IT!! 

Now tapioca is warm and translucent (if you can't tell from before picture before, the tapioca on the bottom on the bottom is more translucent)

Final product: Bubble milk tea <3

 The adventure continues--
tomorrow.


For now, I'm getting some sleep.


G'Night/G'Day Guys!!


~Sweet Pea


The Bubble Tea Adventure

Hello chefs everywhere!!
I haven't been blogging for a while because life happened, and things got busy and I've been running around dealing with life.


I don't have a camera with me currently, but I wanted to share my experience with making nai cha (milk tea) just yesterday!! My first time making it, tasted delicious!!


I love bubble tea, I would consider myself a bubble tea enthusiast actually. If you haven't tried it, you should buy at a Quickly's or Chatime (here in the big apple). I think that making bubble tea was a very interesting experience, but not one for the fainthearted chef. If you have the patience, dedication, and time to spare, read on (and if not, store bought bubble tea is really yummy too!!).


Note: this is more like a log of my experience making bubble tea, I will write a recipe later but for now I am just documenting the very interesting experience.


Equipment:

  • Medium Strainer (if you're challenged by vague words like medium, like me, 3" to 5" diameter is a good size) Note: the mesh doesn't need to be fine, preferably a mesh strainer
  • Bowl (this should be near the same size as the strainer)
Food Stuffs:
  • Tapioca (mine was dried, white one)
  • Measuring Spoons (mine is cup sized, as in it measures 1/4 cup, 1/3 cup, & c.)

The first thing that I did was google how to make the tapioca, since I'm new to this. I started out with 2 1/3 cups of water in a medium pot, and let the water come to a rolling boil.

Once the water boiled, I added in 1/3 cup of tapioca (volume ratio of water to tapioca pearls 7:1) and left the pot boiling for 30 minutes, then let it simmer for 1 hour longer (like I said, this was no journey for the fainthearted bubble tea lover). I checked on it frequently during the entire time, about every 10-15 minutes, and every time the water looks starchy and opaque to the point where it's hard to see the tapioca clearly, I added 1/2 cup of water to the pot. Then I turned off the heat and let it sit for 30 minutes on the stove (insert Jeopardy music here :P).

Originally, the dried tapioca pearls were 3-5mm in diameter (the inconsistency--I often sway between metric and imperial measurements, forgive me xP), after 45 minutes they were 5-8mm in diameter and the outer had turned to jelly-like and somewhat see-through with a white center that was about 3mm in diameter.

After two hours, possibly more, of cooking the tapioca pearls are soft on the outside and chewy on the inside, which is how I like them. I know this because I took a spoonful out of the pot, which was taken off the stove after sitting for 30 minutes, put it into the strainer, dip the strainer in ice water, and tried a tapioca pearl. Basically, I had a set up with the strainer in a bowl of cold water, and I place a spoonful of tapioca in the strainer to let it cool, then lift the strainer and put the tapioca into a jar (which is filled with some honey water). Not all of it was put into that jar, some of it was put into my nai cha (milk tea).

So here's the story of making the nai cha:

I started out with a kettle of water, it had about 5 cups of water in it. I put in a tea bag, put on the lid, and put it on the stove to boil (I multitask, so I also happened to be making my tea while the tapioca was cooking). After it comes to a boil, I let it sit and steep for a few minutes (preference of taste for how strong I like my tea). 

I take my jar of brown sugar, and a jar of white sugar and grabbed a large spoon (soup spoon?) and a 1 litre/4 cup measuring cup (pyrex, or any other heat resistant glass works fine). I put 4 scoops of brown sugar and one scoop of white sugar into the cup, then poured the about 1 1/2 cups of tea over the sugar, and stirred. Most of it dissolved without stirring, and I then stirred to dissolve the rest. I tasted a spoonful, tastes just like at Chatime!! Just missing the milk. 

This is a fun time to try out martini shaker (a fun way to mix bubble tea, and I feel so professional ;D). I fill the container 3/4 full with tea (which has cooled off by now because I left it for a while--it's only warm) and add milk until the tea is a light tan color...and then...SHAKE IT~ SHAKE~ SHAKE IT~~~ ;] And I learn that shakers are better used with cooler liquids because otherwise the pressure builds up and leaves a mess (warm=little mess; big= huge mess--I presume, I would not recommend trying it). 

I added two spoonfuls of tapioca, and now my nai cha is complete!! The rest of the tea and tapioca is living in my fridge currently. Until another day where I decide to treat myself to some more nai cha ;)

Prepare to see pictures later, I will upload!! Maybe even later today!!

Viva la Homemade Bubble Tea!!
Your friend,

Sweet Pea